NOTICE: There is now a cheaper and better solution available here!
Requirements
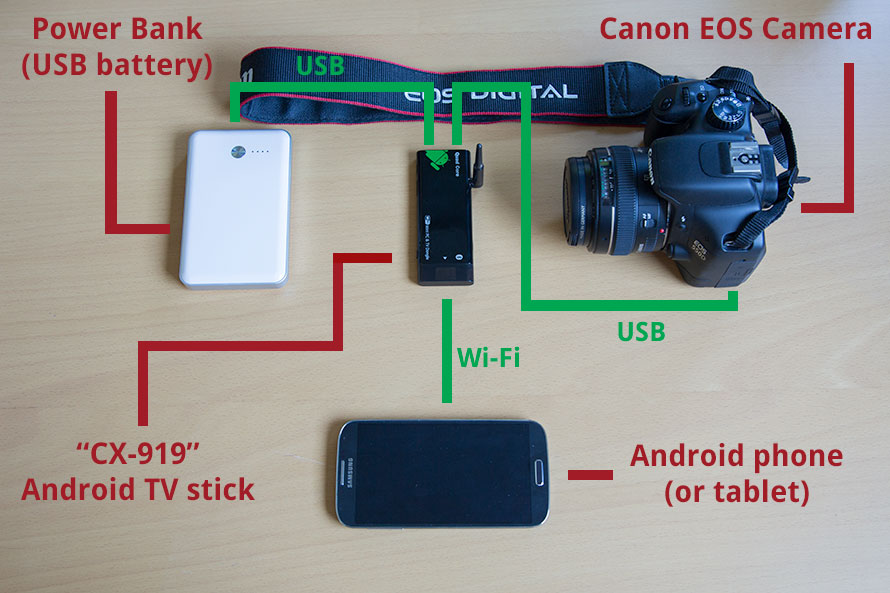
- Phone or tablet with the DSLR Controller Android app
- DSLR Controller Wi-Fi Stick Android app
- A compatible Android TV stick
- A power bank or other power source
- A willingness to tinker
The stick needs to run a specialized version of DSLR Controller to be able to serve as a wireless controller. You cannot use the normal version of DSLR Controller for this. You can get this special version of the software for your stick in the Play Store by searching for DSLR Controller Wi-Fi Stick.
Android TV stickThere are many different Android TV sticks out there, each with their own little quirks and issues. Over the months during which we were developing this, we have tried out dozens of sticks. Most of the common sticks have show-stopper issues, preventing them from being a good match. Ultimately, we have settled on the CX-919 as reference device, it works well for us.
Though we cannot supply CX-919's ourselves at this time, you can order them all around the internet. Though probably not the cheapest, GeekBuying.com has a good reputation for this sort of hardware. You need the version running Android 4.2. While it is possible to upgrade a 4.1 unit to 4.2, it is a tricky operation (see the devices page for details). If you're looking on other sites to compare prices, you should always take a close look on how many pieces you're buying - some sneaky sellers from China will seem cheap, but they'll add a 5 dollar keyboard in the mix, and charge you for two pieces, so twice the price listed!
Aside from the CX-919, we have used a number of other sticks with varying degrees of success as well. The most common problem is that the stick's firmware either does not support creating an access point (hotspot), or when it does, it will eventually crash (common Realtek chip issue) and require a restart of the stick. You can still use by far most modern sticks out there in normal Wi-Fi mode, though (this would require another device to be the access point). The Android phone or tablet you are using might support creating an access point itself, so you may not need the stick to do it. We have created a free Android app that can turn your Android device into an access point if the firmware supports it, you can find it in the Play Store as Hotspot Control. Note that you can indeed run the stick version of DSLR Controller on an Android phone or tablet as well, if you have one to spare to connect to your camera, and it meets the requirements - but you could just use DSLR Controller's existing Wi-Fi Passthrough Mode option for that.
The specialized version of DSLR Controller that runs on these Android TV sticks does require at least a dual-core CPU and root access. Not all sticks on the market come pre-rooted! You should also keep in mind that even though you can use these sticks as full-fledged computers and media players, we recommend caution. Any app you install or enable, and any account you add to the device, may severely degrade DSLR Controller performance. This is not just a warning to cover our behinds, this is an actual problem on these devices.
Power bankA power bank is just a fancy name for an external battery. These Android TV sticks do not have their own power source, and you can't run them off your camera's power, so you need some other way to provide power to them. Most will come with a wall charger, and if not (or it has the wrong plug for your country) you can usually provide power using one of your phone's chargers. While that may be fine around the house or in the studio, that doesn't work in the field, and that's when you'll need that external battery.
If you're a traveller or techie, chances are you already have one or more power banks around, as they're very handy for recharging phones, tablets and music players on the go. If not, there's a wide selection of them for you to choose from. They come in all shapes, sizes, and prices. The one absolutely requirement is that it can provide 5V at 1A. We've had some problems with power banks that could only deliver 0.7A. We are using a generic 7000 mAh power bank, which is on the expensive side but provides more than enough power for a day-long shoot.
The well known sites will offer you many choices of power banks to purchase, be sure to read the reviews on the one you're considering. In the world of online purchases, not all mAh's are created equal, and a 20000 mAh power bank may not last as long as a 7000mAh one. As the one we used is generic, we cannot advise you a brand to go for, but if you were to enter "7000 mAh power bank" into eBay, you will probably find a couple that look identical to the one in our video and photos.
Setting up the stickWhen first booting up the stick, you need to hook it up to your television (or HDMI-capable monitor) and attach a keyboard or mouse for configuration. You will have to open the Play Store and enter your Google account details to be able to get the special software. Be aware that your date and time need to be set correctly on the stick, or you will not be able to sign into the Play Store!
Once signed in, download and install the DSLR Controller Wi-Fi Stick app. Double check that you're not installing the normal DSLR Controller app! Once installed, open up the app. It will tell you it needs to convert to a system app, and it will automatically close after you press the OK button. You need to reboot the stick - don't skip this step. Once the reboot is complete, start the DSLR Controller Wi-Fi Stick app again, this time you will be presented with a configuration screen.
The most important setting is Wi-Fi Mode, which configures how Wi-Fi should be set up when you connect the stick to your camera. in Known Networks mode, it will try to connect to any Wi-Fi network you have configured on the stick under Wi-Fi settings. In Create Access Point mode, it will create a hotspot your Android phone or tablet can connect to. In Both mode, it will try to connect to any known Wi-Fi networks for 15 seconds, after which it will switch to Access Point mode if none are found.
If Create Access Point works on your device, it is the advised setting to use. Connecting using a private hotspot as created by this option is faster than connecting using an existing Wi-Fi network. If this option does not work at all on your device, using the Known Networks setting is advised, so it will not waste time during startup trying and failing to create an access point.
OperationNow that you have everything setup, actually using it is very straightforward. Power on the stick (simply connect it to a power outlet or power bank), connect the camera to the stick using the same USB cable you would use to connect it to your PC, and wait about a minute. Unless you have turned off that option in the app's configuration or your camera does not have liveview, you should hear the mirror flip up and down, which is the signal that everything is ready for use. On your Android phone or tablet, connect to the stick's Wi-Fi network, then start the (normal) DSLR Controller app. It will automatically detect and connect to the stick, and you're all set!
If the stick was already powered on before connecting the camera, it will only take a few seconds for the stick to become ready. If you just powered it on, it takes about 60 seconds to boot up. Please make sure your camera is not set to automatically power off after a minute of inactivity - the camera might have turned itself off before the stick is operational. When you close the DSLR Controller app on your Android phone or tablet, please note the stick will take about 30 seconds before you can re-connect. If for some reason it stops responding, just reboot the stick by pulling and re-inserting the power cable.
Performance note: If you use the port on the side of the stick for power, and the full-sized port to connect your camera, in most cases this will significantly boost performance compared to using the two ports next to eachother.