Requirements
- Phone or tablet with the DSLR Controller Android app
- TP-Link TL-MR3040 portable wireless router
- A willingness to tinker
The TL-MR3040 is a low-cost portable wireless router (at the time of writing it's about 40 USD in the USA or 40 EUR in Europe). It's tiny box that provides a Wi-Fi hotspot (access point), optionally providing an internet feed delivered by an ethernet cable, or a USB 3G/4G modem. What we are going to do is flash a custom firmware, which will allow you to connect your camera to the USB port instead of a USB modem, and connect the DSLR Controller app over Wi-Fi. This will essentially add a Wi-Fi function to any Canon EOS model.
The TL-MR3040 has it's own 2000 mAh battery that will last you a few hours. It can be charged or powered by a standard microUSB connector, so you can use a portable battery pack (power bank) or a wall charger to use it even longer.
RevisionsAt the moment, there are multiple hardware revisions of the TL-MR3040. Before continuing, you need to find out if you are using a v1.x or v2.x model. There is a sticker located behind the battery that tells you which version you have. There's an article on the TP-Link website describing how to find the hardware revision as well. Please make absolutely sure you are certain which version you have before continuing, as flashing the firmware for the wrong version will break your TL-MR3040.
FirmwareThe custom firmware we will be using is based on OpenWRT, which is a fully capable open source router operation system. Flashing this custom firmware will still allow you to use your TL-MR3040 as a normal access point, however the functionalities may not match exactly. You should consider this unit lost to DSLR Controller. It is technically possible to restore a TP-Link original firmware to the device, but it's a bit of a hassle and we do not explain nor support this operation at this time.
Please download the custom firmware for your device's hardware revision (approximately 4 MB):
TP-Link TL-MR3040 v1.x
TP-Link TL-MR3040 v2.x
The custom firmware can be flashed directly from the TP-Link management interface. If you have just unpacked the device, there's a sticker behind the battery cover with the information you need. It lists a Wi-Fi network name, the Wi-Fi network password (if needed), the IP address of the management interface, and the username and password for the management interface.
If you have the v2.x model, set the mode switch to 3G/4G before turning on the device. During our own testing, it would not work when set to WISP or AP modes.
After turning on the device, wait for the Wi-Fi indicator LED to turn on (this will take about 30 seconds), and connect to the new Wi-Fi network with the provided password. Open your browser and input the listed IP address. This will open the management interface, which will prompt you for the username and password.
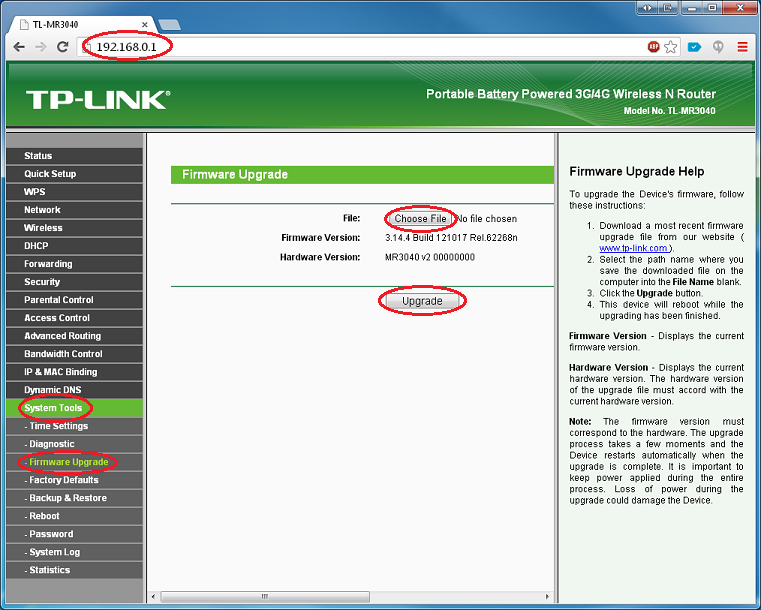
Now that you are inside the management interface, go to System Tools -> Firmware Upgrade, and use the Choose File button to select the firmware file you just downloaded. Press the Upgrade button to flash the firmware.
Flashing the firmware will take a minute or two. The interface will likely advise you to refresh your browser, but this is actually not what you want to do. Watch your Wi-Fi connection status on your computer or laptop, after a minute or two you will notice that it has lost Wi-Fi connection, while the TL-MR3040 reboots. Another minute later, there should be a Wi-Fi network called DSLRController. You can close the browser window now.
Default settingsBy default, the custom firmware is configured with these settings:
- Network name: DSLRController
- Network password: dslrcontroller
- Network encryption: WPA2/PSK
- Management interface address: http://192.168.1.1/
- Management interface username: root
- Management interface password: dslrcontroller
Your TL-MR3040 is now ready for use, but you can customize the above settings first if you wish.
OperationNow that you have everything setup, actually using it is very straightforward:
- Power on the TL-MR3040
- Wait for the Wi-Fi LED to turn on
- Connect your Android phone or tablet to the DSLRController Wi-Fi network
- Connect your camera to the TL-MR3040 by USB cable
- Start DSLR Controller on your Android device
DSLR Controller should automatically detect the camera. If it does not, please make sure you are actually connected to the correct Wi-Fi network, and the camera is both on and awake (not sleeping).